
- A test coverage plan is a roadmap, not a spec.
- When you’re figuring out how to write a test coverage plan, document what to test, how to test it (automated vs. manual), and what order to build it in so coverage stays explainable and gap-free.
- Define workflows so tests stay independent and durable.
- A test coverage plan should break the product into workflows with clear start/end states, one primary goal, minimal branching, reusable setup, and deterministic execution to avoid brittle, interdependent automation.
- Prioritize automation by impact, not volume.
- Tag every workflow as automate now, automate later, or manual only based on risk, usage, and business cost of failures.
- Scope each test case to a single behavior.
- When you write a test coverage plan, each test case title should describe one decision point (one validation rule, one error condition, or one user action) so the suite is easy to build, debug, and maintain.
- Use Arrange-Act-Assert (AAA) as the handoff to automation.
- Turn test case descriptions into outlines with Arrange (setup), Act (interaction), and Assert (expected outcome) so anyone can implement the test consistently without guesswork.
- Keep the plan alive and visible.
- A test coverage plan is a roadmap, not a one-time doc—track manual-only areas for full visibility, outline tests in batches, and review quarterly or after major product changes and incidents.
Teams assigned to build test coverage jump in without a clear plan or vision. Instead of a strategy and roadmap, teams prioritize based on whoever makes the most noise or whatever seems urgent in the moment. Without a clear model for what to test and why, teams build suites with coverage gaps. That leads to missed bugs and slower iteration because the team ends up testing the wrong things in the wrong order. A comprehensive test coverage plan solves this.
What is a test coverage plan?
A test coverage plan is a strategic document that identifies which features, workflows, and behaviors in your application should be tested, how they should be tested (automated vs. manual), and in what order. It's a roadmap for identifying where automation will have the most impact and how to show progress toward real coverage without spending weeks in planning mode.
The 4 steps to creating a test coverage
QA Wolf uses this four-step process when creating coverage plans. We designed our process to produce functional, durable, and high-value tests fast, even if your team is starting from zero.
- Define your testable workflows
- Decide what to automate when
- Scope each test case to one behavior
- Write outlines that are easy to turn into code
Step #1: Map your product’s workflows
A workflow is a self-contained sequence of user actions that completes a distinct task. Each one should be independently runnable and start from a clean slate. If you have to reset or configure the app in a special way to test a path, that path should be a separate workflow.
The more you define workflows this way from the start, the less you’ll spend maintaining brittle, interdependent tests later.
Five rules for defining workflows
- Clear start and end states: A workflow should begin from a known state (e.g., logged out, fresh session) and end in a verifiable outcome (e.g., a confirmation screen, an updated dashboard, or an error message).
- One primary goal per workflow: Keep each workflow focused on one goal. "Checkout with promo code" is a separate workflow from "Checkout with PayPal."
- Minimal internal branching: A workflow should stay focused on a single user goal. If a test path requires stepping away from the goal (like editing a profile during checkout), test that separately.
- Reusable setup: Group test cases that share setup (auth state, seeded data). If the setup diverges significantly, split the workflow.
- Deterministic execution: Flows should run reliably across environments. Flag any path that relies on non-deterministic behavior, static data, or third-party availability.
Example workflows:
- "Log in from the homepage."
- "Reset password via email link."
- "Publish a new post."
- "Purchase item with saved credit card."
These often map to user stories, feature flags, or product epics. Start broad, then refine. Group by feature set, navigational area, or customer intent—whatever best reflects how your teams deliver work.
Track workflows in a format that integrates with test planning and CI visibility—Git markdown files, a TestRail tree, or QA Wolf’s test graph each provide the visibility you need.
Step #2: Prioritize workflows to automate
Prioritize workflows based on risk, usage, and business impact. Focus on workflows that are critical to your customers and business—the ones that break production, block releases, or drive support tickets when they fail.
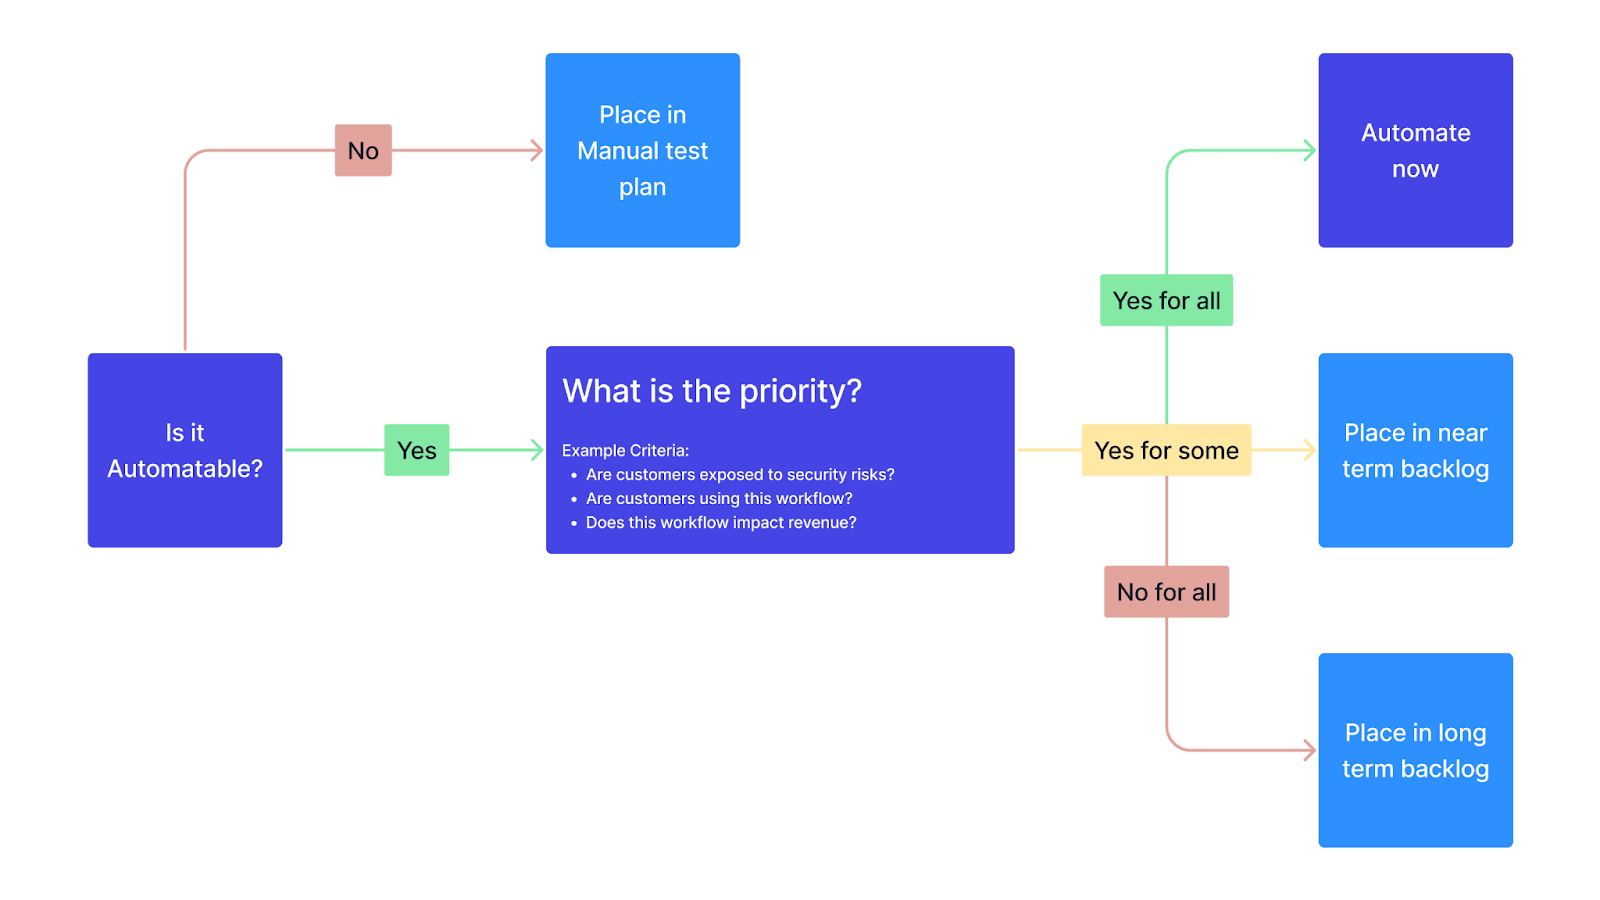
You don't need to automate everything, and what you decide to automate doesn't need to be done all at once. Also, consider your dependencies. Sometimes a lower-priority workflow needs to be built first because other, higher-priority tests depend on it. In those cases, build the dependency early to unblock what matters most.
Tag each workflow with a coverage decision
- Automate now: High-risk, high-usage, or high-friction workflows.
- Automate later: Still worth covering, but not urgent.
- Manual only: Either not worth automating or not possible to automate.
Questions to guide automation decisions
Use these questions to help make the call:
- How often is this used?
- What happens if it breaks?
- Is it part of a critical path (signup, checkout, login)?
- Is it new code or known to break often?
Don't skip tracking workflows that are manual-only—just make sure your team tracks them. You want complete visibility, even if some gaps are intentional.
Your coverage plan works like version control: start with the full picture of all workflows, then branch into specific test cases as you prioritize and build. Front-load the top-priority workflows; the rest can be developed just-in-time, triggered by new features, bug reports, or repeat incidents. This lets you scale coverage as needed without wasting effort on low-risk paths too early.
Step #3: Break down workflows into test cases
Now that you’ve defined your workflows and decided what to automate, the next step is to scope your test cases. Each case should represent one behavior or decision point, described in a clear, specific title.
Good test case examples:
- "Log in with valid credentials."
- "Reject log in attempt with wrong password."
- "Create a draft post with a missing title."
Bad test case examples:
- "Log in with good and bad credentials" (this combines two test paths into one)
- "Verify login functionality" (too vague—this could be several things, and we don’t know which)
Step #4: Write outlines for each test case
Outlines are the handoff between planning and automation. At QA Wolf, we follow the Arrange–Act–Assert (AAA) structure. Write out each test case outline as a comment block that includes:
- Arrange: Prepare the environment. This might include setup steps (such as creating users or data), cleanup logic, or any functionality already validated in other tests.
- Act: The direct user interaction under test—clicks, form fills, submissions, navigation.
- Assert: The expected outcome. It could be a UI message, a redirect, or a change in database state.
Use consistent language for actions and UI elements. Your goal is to create an outline that is both readable and immediately implementable by anyone on the team.
A good coverage plan keeps tests useful and teams focused
Don't treat your coverage plan as a one-and-done. It should evolve with the app. Review it every quarter with product and engineering:
- Are your priorities still right?
- Are new features tested?
- Are old tests still valuable?
- Do manual-only areas need revisiting?
Test automation only works when you test critical workflows in a maintainable structure. A clear, actionable coverage plan gives your team the structure to do exactly that. It turns instinct into alignment, guesswork into repeatability, and scattered effort into high-impact testing.
When you define workflows upfront, prioritize by risk, and structure test cases around specific behaviors, your team avoids writing brittle tests and chasing edge cases that don’t matter. And when you treat the plan as a living artifact—updated with every release, incident, or roadmap shift—you keep coverage aligned with the customer experience and make progress visible to everyone who depends on it.

How long does it take to create a test coverage plan?
For most web applications, creating an initial test coverage plan typically takes a few days when done manually. This usually involves time to identify key workflows, decide which paths to automate first, and outline test cases for the most important user behaviors.
Larger applications or systems with complex integrations can take a week or more, especially if planning is done upfront in a single pass. The key is to work in batches—outline 10-20% of test cases initially, then expand coverage iteratively as you build tests.
Using an end-to-end testing platform like QA Wolf can significantly speed up this process. QA Wolf’s AI Mapping Agent autonomously explores your app and maps hundreds of workflows and test cases in minutes.
What should be included in a test coverage plan?
An effective test coverage plan should include:
- A list of all testable workflows with clear start/end states.
- Prioritization tags indicating what to automate now vs. later vs. manual-only.
- Individual test case descriptions scoped to single behaviors.
- Test outlines using Arrange-Act-Assert structure.
- Dependencies between workflows.
The plan should be a living document updated quarterly with product changes.
How do you prioritize test automation in a coverage plan?
Prioritize test automation by asking four questions:
- How often is this workflow used?
- What happens if it breaks?
- Is it part of a critical path like signup, checkout, or login?
- Is it new code or known to break frequently?
Tag workflows as "automate now" if they're high-risk, high-usage, or high-friction. Tag as "automate later" if they're valuable but not urgent. Tag as "manual only" if automation isn't cost-effective or technically feasible. Always consider dependencies—sometimes lower-priority workflows must be built first to unblock higher-priority tests.
How often should I update my test coverage plan?
Review and update your test coverage plan quarterly at minimum, or whenever major product changes occur. During quarterly reviews, verify that priorities still align with business goals, ensure new features have test coverage, evaluate whether old tests remain valuable, and reassess manual-only areas for automation opportunities. Additionally, update the plan immediately after production incidents, when new critical paths are introduced, or when test maintenance costs spike—these are signals that coverage priorities need adjustment.